This article will explain how to add your Ubuntu kvm host on NSX-T.
We are using NSX-T 2.3 which is compatible with Ubuntu 16.04 version.
Ubuntu server preparation
You will need at least two network interfaces on your Ubuntu server host:
- ens160 for managment
- ens192 for NSX-T VTEP
# The primary network interface
auto ens160
iface ens160 inet static
address 192.168.1.163
netmask 255.255.255.0
gateway 192.168.1.1
dns-nameserver 192.168.1.190
You can leave ens192 unconfigured as you will use it later.
As explained in the NSX-T documentation, if not done already, you must install virtualization packages and dependencies:
# apt-get install qemu-kvm
# apt-get install libvirt-bin
# apt-get install virtinst
# apt-get install virt-manager
# apt-get install virt-viewer
# apt-get install ubuntu-vm-builder
# apt-get install bridge-utils
Your Ubuntu Kvm host is set and you should be able to create virtual machines.
Now we install NSX-T needed dependencies
# apt-get install libunwind8 libgflags2v5 libgoogle-perftools4 traceroute python-mako python-simplejson python-unittest2 python-yaml python-netaddr libprotobuf9v5 libboost-chrono1.58.0 libgoogle-glog0v5 dkms libboost-date-time1.58.0 libleveldb1v5 libsnappy1v5 python-gevent python-protobuf ieee-data libyaml-0-2 python-linecache2 python-traceback2 libtcmalloc-minimal4 python-greenlet python-markupsafe libboost-program-options1.58.0 let’s add NSX-T as networking manager.
NSX-T manager configuration
We need to retrieve the SSH Thumbprint from the Ubuntu KVM Server:
# awk '{print $2}' /etc/ssh/ssh_host_rsa_key.pub | base64 -d | sha256sum -b | sed 's/ .*$//' | xxd -r -p | base64Login to your NSX-T manager, on the left pane: select “Fabric”, “Nodes” and click “+ ADD”
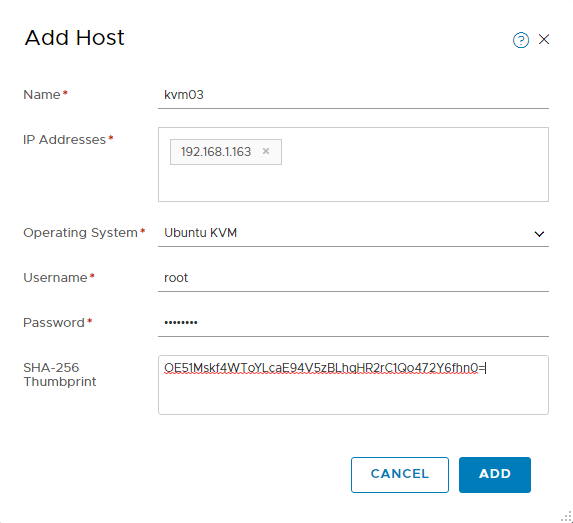
We used root account, i have enabled root over SSH and set password for root on Ubuntu, which is not a default configuration.
You can follow NSX-T install by viewing /var/log/dpkg.log file.
If the installation success you should see something like this:

If the install fail, check if the account has sufficient permission to install packages using dpkg and check if some dependencies are not missing.
Before attempting another installation you may need to cleanup your host from already installed NSX-T packages.
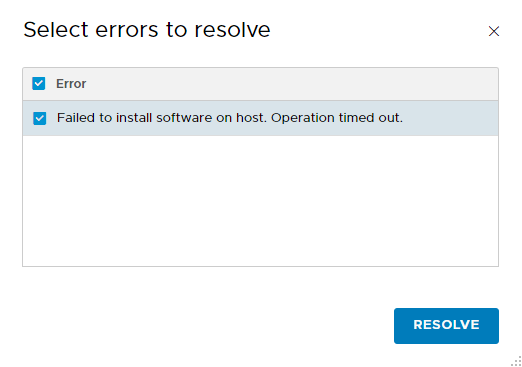
The “resolve” button on NSX-T manager will retry an installation of all packages, you will need to provide credentials again and SSH Thumbprint will be mandatory this time.
Add your kvm host to a transport zone
Login to your NSX-T Manager, on the left pane: select “Fabric” , “Nodes”, click the “Transport Nodes” tab and click “+ADD” .


NSX-T is now ready and you can use it on your Ubuntu kvm host.
If you connect to your kvm host, you should see in the “/etc/network/interfaces” file a new interface named nsx.vtep0.0, this interfaces is associated with the transport zone “overlay-zone”. .
auto nsx-vtep0.0
iface nsx-vtep0.0 inet static
    pre-up ip addr flush dev nsx-vtep0.0
    address 10.10.10.5
    netmask 255.255.255.0
    mtu 1600
    hwaddress ether 66:41:37:88:44:4a
    down ifconfig nsx-vtep0.0 down
    up ifconfig nsx-vtep0.0 up
The IP address “10.10.10.5” was taken from the IP Pool “vtep-pool” that we provided in the transport node configuration page.
This VTEP will be used to encapsulate virtual machines traffic using Geneve between VMs host (KVM or ESXi).
NSX-T use Openvswitch on KVM host to manage virtual machine logical switch port, you can see an Openvswitch bridge called “nsx-managed” created on the kvm host, NSX-T will be able to manage every KVM virtual machines network interfaces connected to this bridge.
Use “ovs-vsctl show” command to see the Openvswitch bridge and you will be able to see every VM connected to a logical switch port.
root@kvm03:~# ovs-vsctl show
3add4ebb-a91f-4304-a087-bc7339254104
    Manager "unix:/var/run/vmware/nsx-agent/nsxagent_ovsdb.sock"
        is_connected: true
    Bridge nsx-managed
        Controller "unix:/var/run/vmware/nsx-agent/nsxagent_vswitchd.sock"
            is_connected: true
        fail_mode: secure
        Port nsx-managed
            Interface nsx-managed
                type: internal
        Port hyperbus
            Interface hyperbus
See: https://www.loasys.net/virtualization/connect-kvm-vm-nsx-t-lsp
Source: NSX-T online documentation: https://docs.vmware.com/fr/VMware-NSX-T-Data-Center/index.html
That’s it !, i hope you found something useful.
Very helpful and to the point.
hi Loasys,
if (all) the physical NIC needs to use specific VLAN tag, then should the “ens192.XXXX” be chose as phsical NIC for the N-VDS(in the add transport node windows) in your case??
Hi Intiate,
Yes that’s right, but your uplink profile would have a Transport VLAN 0.