This article will explain how to connect an KVM VM hosted on Ubuntu server hypervisor to an NSX-T logical switch port.
We assume that the Ubuntu KVM hypervisor is already a transport node on your NSX-T environment.
See: https://www.loasys.net/virtualization/add-ubuntu-kvm-host-nsx-t
As explained in the NSX-T administration guide you need to retrieve your VM interfaceid using the command below:
# virsh dumpxml vm-name | grep interfaceidBefore doing that, you need to configure your VM parameters in other word you have to attach your VM network port to the “nsx-managed” bridge.
KVM VM configuration
Let’s create an VM using command line and attach the virtual port to the “nsx-managed” bridge.
We will use a Vyos iso file to create our VM.
The VM configuration will be 1 vCPU, 1 GB of Ram and 4 GB of Disk.
# virt-install --name=Vyos01 --vcpu=1 --memory=1024 --cdrom=/media/vyos-1.1.8-amd64.iso --disk size=4 --network bridge:nsx-managed,model=virtio,virtualport_type=openvswitchMost importantly, we specified the “nsx-managed” bridge to attach the virtual network port and the virtual port type of “openvswitch”.
Actually, we could avoid specifying those parameters by creating a network profile or editing the default network profile.
Create a network profile: “vim /tmp/nsx.xml”.
<network>
<name>nsx</name>
<forward mode='bridge'/>
<bridge name='nsx-managed'/>
<virtualport type='openvswitch'/>
</network>
Activate and start the network profile you have created.
# virsh net-define /tmp/nsx.xml
# virsh net-start nsx
# virsh net-autostart nsx
# virsh net-list
 Name                  State     Autostart     Persistent
----------------------------------------------------------
 default              actif      yes           yes
 nsx                  actif      yes           yes
Now we can use the command below to create a new VM.
# virt-install --name=Vyos02 --vcpu=1 --memory=1024 --cdrom=/media/vyos-1.1.8-amd64.iso --disk size=4 --network network:nsxThe above command use less parameters in the network part as there are already in the network profile “nsx”.
Let’s retrieve the “interfaceid” of the two VMs we have created previously.
root@kvm03:~# virsh dumpxml Vyos01 | grep interfaceid
        <parameters interfaceid='fa0dc7f2-763e-4c64-a07a-d8c08bd12606'/>
root@kvm03:~# virsh dumpxml Vyos02 | grep interfaceid
        <parameters interfaceid='d1de160a-25e7-4b1e-ab24-95344226552b'/>
Create an NSX-T logical switch
Login to your NSX-T manager, on the left pane select: “Networking”, “Switching”, click the “Switches” tab and click “+ADD”.

OK let’s explain a little bit some of those parameters:
Transport Zone: Choose whether to use an Overlay or Vlan transport Zone.
Uplink Teaming Policy: This teaming policy is defined when you set the Uplink Profile, the default teaming policy is “FAILOVER_ORDER”.
See: https://www.loasys.net/virtualization/create-nsx-t-uplink-profile
Replication Mode: Hierarchical Two-Tier Replication is the default mode. Basically this mode optimize host delivery of VM BUM (Broadcast, Unknown Unicast, Multicast) traffic when host are in different subnet.
In Head mode, when a VM in a logical switch send BUM Traffic, the host of that VM encapsulate the BUM traffic and send a copy via his VTEP interface to each host in the transport zone of the logical switch.
In Hierachical mode, if some hosts are in different subnets, a replicator host will be designated for each subnet, BUM traffic copy will be sent only to those replicator hosts.
A replicator host is responsible for the delivery of BUM traffic to all other host of his own subnet.
The replicator host may be different between logical switch.

The logical switch is created and we can see the Geneve ID
Add KVM VM to NSX-T logical port
On your NSX-T manager, on the left pane select: “Networking”, “Switching”, click the “Ports” tab and click “+ADD”.

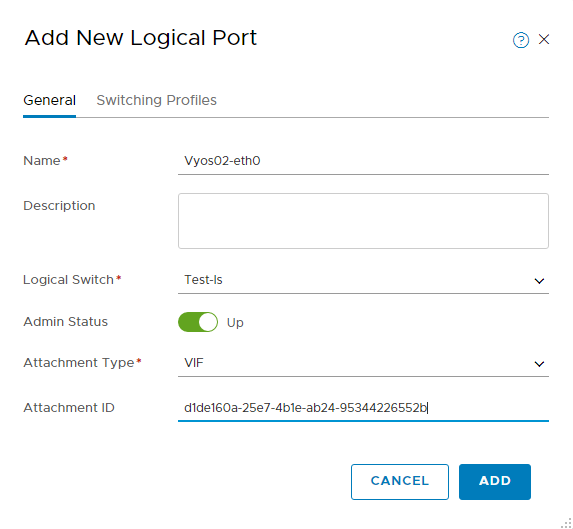
We add a logical port for each KVM VM: Vyos01 and Vyos02.
In the “Attachment ID” we put the “InterfaceID” we retrieved previously

After a few second each port should be Admin and Operational UP
Your KVM VM is now connected to NSX-T logical swich, you can add IP Address and start pinging !
Source: NSX-T online documentation: https://docs.vmware.com/fr/VMware-NSX-T-Data-Center/index.html
That’s it!, i hope you found something useful here.
Well Done !!
Each pass well describe !!
Hello
Really great doc thank you
When doing it in my lab I found that the interfaceid is renewed at each new start of the guest vm and by the way it’s disconnected from nsx-t as interfaceid is different.
How can I set definitively an interfaceid for a VM
Fred
Hello Fred,
Yes, you can install “uuid” on your ubuntu KVM hypervisor, use the uuid command to get an uuid that you will be able to set on your virtual machine.
Use the “virsh edit vm-name” and replace the interfaceid, this should persist, of course you’ll have to set the VIF on NSX-T again.