This series of articles will show how to configure NSX-T and Kubernetes.
The NSX-T version is 2.5 and the kubernetes cluster version 1.14 is based on Ubuntu 16.04.
Kubernetes
NSX-T 2.5 is only compatible with Kubernetes version 1.13 or 1.14.
We will have to specify the package version in the install process.
The installation of Kubernetes is pretty straightforward and well documented on Kubernetes webpage.
For this article i will use a three nodes cluster with 1 master and 2 workers.
Ubuntu server preparation
You will need at least two network interfaces on your Ubuntu servers.
- ens160 for managment
- ens192 for Overlay (Pods trafic)
# The management network interface
auto ens160
iface ens160 inet static
        address 192.168.1.90
        netmask 255.255.255.0
        gateway 192.168.1.250
        dns-nameservers 192.168.1.190
# The secondary interface for overlay
auto ens192
iface ens192 inet manual
Install Docker
We will install Docker version 18.06 as container runtime which is easy to go.
$ sudo apt-get install -y apt-transport-https ca-certificates curl gnupg2 software-properties-common
$ curl -fsSL https://download.docker.com/linux/$(. /etc/os-release; echo "$ID")/gpg | sudo apt-key add -
$ sudo add-apt-repository "deb [arch=amd64] https://download.docker.com/linux/ubuntu \ $(lsb_release -cs) stable"
$ sudo apt-get update && apt-get install -y docker-ce=18.06.2~ce~3-0~ubuntu docker-ce-cli=18.06.2~ce~3-0~ubuntu
Configure docker cgroup driver and storage driver. See the Docker documentation for supported storage driver.
$ sudo cat >> /etc/docker/daemon.json <<EOF
{
  "exec-opts": ["native.cgroupdriver=systemd"],
  "log-driver": "json-file",
  "log-opts": {
    "max-size": "100m"
  },
  "storage-driver": "overlay2"
}
EOF
Create Docker daemon folder and restart docker
$ sudo mkdir -p /etc/systemd/system/docker.service.d
$ sudo systemctl daemon-reload
$ sudo systemctl restart docker
Install Kubernetes
First disable swap or kubeadm won’t init the cluster also comment out the swap line on “/etc/fstab” so the change will be persistant.
$ sudo swapoff -aInstall kubernetes package version 1.14
Use “apt-cache policy kubectl” to see which versions are available.
$ curl -s https://packages.cloud.google.com/apt/doc/apt-key.gpg | sudo apt-key add -
$ sudo add-apt-repository "deb http://apt.kubernetes.io/ kubernetes-xenial main"
$ sudo apt-get update
$ sudo apt-get install -y kubelet=1.14.8-00 kubeadm=1.14.8-00 kubectl=1.14.8-00
Keep the Kubernetes packages in the same version and do not update them.
We could do the same for docker version as well.
$ sudo apt-mark hold kubelet kubeadm kubectlInitialize the cluster
This part is only needed on the master node, and will initialize the kubernetes cluster for NSX-T use.
$ sudo kubeadm init --apiserver-advertise-address=192.168.1.90As we can see there is no need for “pod-network-cidr” parameter as this will be handled by NSX-T.
This command will output the “join” command that needs to be executed on each worker node.
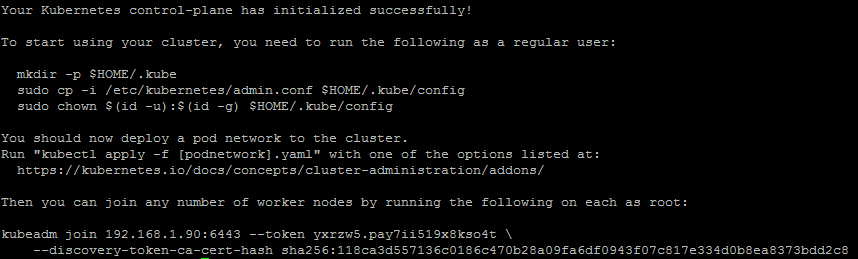
To manage the cluster from the master node, we need to copy the “admin.conf” file to our user home directory by issueing:
$ mkdir -p $HOME/.kube
$ sudo cp -i /etc/kubernetes/admin.conf $HOME/.kube/config
$ sudo chown $(id -u):$(id -g) $HOME/.kube/config
Add workers
As we are not going to install any pod network addons yet, we can issue the kubeadm join command provided above on worker node already.
$ sudo kubeadm join 192.168.1.90:6443 --token yxrzw5.pay7ii519x8kso4t --discovery-token-ca-cert-hash sha256:118ca3d557136c0186c470b28a09fa6df0943f07c817e334d0b8ea8373bdd2c8Finalize
Issue the “kubectl get nodes” command on the master, this will list our master and workers nodes.
As there is no network plugin installed, all nodes should be in “not ready” state.
loasys@kube-master01:~$ kubectl get nodes
NAME            STATUS     ROLES    AGE   VERSION
kube-master01   NotReady   master   43m   v1.14.8
kube-worker01   NotReady   <none>   19m   v1.14.8
kube-worker02   NotReady   <none>   18m   v1.14.8
NSX-T and Kubernetes
The NSX-T controller docker image is not available through internet, we have to download it from vmware website and push it to the docker local registry on all nodes (master and workers).
Upload the “nsx-ncp-ubuntu-2.5.0.14628220.tar” file to all nodes and add it to the local registry.
$ sudo docker load -i nsx-ncp-ubuntu-2.5.0.14628220.tar
$ sudo docker tag registry.local/2.5.0.14628220/nsx-ncp-ubuntu nsx-ncp
The NSX-T control plain container image is now on your local registry and ready to be used.
This conclude the first part of this NSX-T and Kubernetes series.
That’s it!, i hope you found something useful here. See you on part 2