The first part of this NSX-T and Kubernetes series of post was about the setup of kubernetes on Ubuntu server using docker.
The second part was about NSX Control plane configuration.
This last part will focus on configure Kubernetes for NSX-T and deploy application with loadbalancer.
Configure Kubernetes for NSX-T
The NSX-T container archive comes with a YAML file which allow the deployment of all NSX-T containers.
For Ubuntu we have the “ncp-ubuntu.yaml” file, we will fill all informations needed like variables and deploy through kubectl command.
Below we we will show all sections that needs to be modified and variables which need to be set in order to deploy successfully.
Secret section
This section set all certificates needed for authentication to the NSX-T manager and for TLS. The NSX manager allow to modify the TLS certificate later.
---
# Client certificate and key used for NSX authentication
#kind: Secret
#metadata:
#  name: nsx-secret
#  namespace: nsx-system
#type: kubernetes.io/tls
#apiVersion: v1
#data:
#  # Fill in the client cert and key if using cert based auth with NSX
#  tls.crt:
#  tls.key:
In a production environment we should use a dedicated account.
The Key and Certificate must use base64 format in the “tls.crt” and “tls.key” variables.
---
# Certificate and key used for TLS termination in HTTPS load balancing
kind: Secret
metadata:
  name: lb-secret
  namespace: nsx-system
type: kubernetes.io/tls
apiVersion: v1
data:
  tls.crt:
  tls.key:
This is the certificate and key for load balancer virtual server when using https. use the command: “cat file | base64 -w 0” and paste it.
ConfigMap ncp.ini nsx-ncp-config section
[nsx_v3]
# In a production environment we should use certificate
#nsx_api_cert_file = /etc/nsx-ujo/nsx-cert/tls.crt
#nsx_api_private_key_file = /etc/nsx-ujo/nsx-cert/tls.key
nsx_api_user = admin
nsx_api_password = MyPassword

# Controllers IP addresses
nsx_api_managers = 192.168.1.241, 192.168.1.242, 192.168.1.243

# To bypass self signed certificate of NSX-T controllers
insecure = True

# Each namespace will have a /24 subnet from the container_ip_blocks
subnet_prefix = 24

# NSX-T load balancer configuration
use_native_loadbalancer = True
l4_lb_auto_scaling = True
default_ingress_class_nsx = True
lb_default_cert_path = /etc/nsx-ujo/lb-cert/tls.crt
lb_priv_key_path = /etc/nsx-ujo/lb-cert/tls.key
pool_algorithm = ROUND_ROBIN
service_size = SMALL
l7_persistence = source_ip
l4_persistence = source_ip

# this is where we put all informations retrieve from NSX-T previously
container_ip_blocks = 0c99b7ea-7d74-4763-8e3e-ba79a0619f3e
external_ip_pools = b49e44b9-6433-4b61-a8a2-c764fe2fd859
top_tier_router = 3d757cf9-1111-4fb8-ac89-d6a4abb73c5c
external_ip_pools_lb = 6c6e6f36-75c6-4493-9791-7f29e1179cf8
overlay_tz = e8bbadc9-cd84-42f3-b28e-07ce585ed0c3
lb_service = 4ba2ccaa-67bf-4ae1-9200-b868a6f8cfe9
top_firewall_section_marker = 81a84999-2114-4cec-bbb8-58d3a9eca1ed
bottom_firewall_section_marker = 84b62ad6-d395-4043-87ce-1d982f88eb03
edge_cluster = d83f08b6-0d13-45f5-8271-f1609831b6ee

dns_servers = 192.168.1.190

[coe]
# The name must be the same as the ncp/cluster tag we put on the ports of all kubernetes nodes
cluster = k8s02
node_type = HOSTVM

[k8s]
apiserver_host_ip = 192.168.1.90
apiserver_host_port = 6443

# This is default configuration, all pods are able to access the apiserver using automatically created token
client_token_file = /var/run/secrets/kubernetes.io/serviceaccount/token
ca_file = /var/run/secrets/kubernetes.io/serviceaccount/ca.crt
http_ingress_port = 80
https_ingress_port = 443

# Pods within the same namespace will be able to communicate with each other
baseline_policy_type = allow_namespace
Deployment Section
          volumeMounts:
          - name: config-volume
            # NCP expects ncp.ini is present in /etc/nsx-ujo
            mountPath: /etc/nsx-ujo/ncp.ini
            subPath: ncp.ini
            readOnly: true
          # To use cert based auth, uncomment the volumeMount
          # Update ncp.ini with the mounted cert and key file paths
          #- name: nsx-cert
          #  mountPath: /etc/nsx-ujo/nsx-cert
          #  readOnly: true
          # To add default LB cert, uncomment the volumeMount
          # Update ncp.ini with the mounted cert and key file paths
          - name: lb-cert
            mountPath: /etc/nsx-ujo/lb-cert
            readOnly: true
      volumes:
        - name: config-volume
          # ConfigMap nsx-ncp-config is expected to supply ncp.ini
          configMap:
            name: nsx-ncp-config
        # To use cert based auth, uncomment and update the secretName
        #- name: nsx-cert
        #  secret:
        #    secretName: nsx-secret
        # To add default LB cert, uncomment and update the secretName
        - name: lb-cert
          secret:
            secretName: lb-secret
As we have provided a default Load Balancer certificate for https trafic, we must mount the volume “/etc/nsx-ujo/lb-cert”.
This volume will host the “tls.crt” and “tls.key” files.
In a Production environment we should do the same for “nsx-cert”
ConfigMap ncp.ini nsx-node-agent-config section
[k8s]
apiserver_host_ip = 192.168.1.90
apiserver_host_port = 6443

client_token_file = /var/run/secrets/kubernetes.io/serviceaccount/token
ca_file = /var/run/secrets/kubernetes.io/serviceaccount/ca.crt

http_ingress_port = 80
https_ingress_port = 443

baseline_policy_type = allow_namespace

[coe]

cluster = k8s02
node_type = HOSTVM

[nsx_node_agent]
ovs_bridge = br-int
# ens192 is the interface we defined as manual and will be used for pods trafic.
ovs_uplink_port = ens192
Ensure that the container_ip_blocks is correctly routed and will be able to join the apiserver IP address. See Configure NSX-T Routing.
Don’t forget to redistribute NAT IP on Tier-0 router so all pods will be able to join apiserver IP address.
We are now ready to apply the configuration to the kubernetes master.
Issue the “kubectl apply -f ncp-ubuntu.yaml” command on the master node.
loasys@kube-master01:~$ kubectl apply -f ncp-ubuntu.yaml
customresourcedefinition.apiextensions.k8s.io/nsxerrors.nsx.vmware.com created
customresourcedefinition.apiextensions.k8s.io/nsxlocks.nsx.vmware.com created
namespace/nsx-system created
serviceaccount/ncp-svc-account created
clusterrole.rbac.authorization.k8s.io/ncp-cluster-role created
clusterrole.rbac.authorization.k8s.io/ncp-patch-role created
clusterrolebinding.rbac.authorization.k8s.io/ncp-cluster-role-binding created
clusterrolebinding.rbac.authorization.k8s.io/ncp-patch-role-binding created
serviceaccount/nsx-node-agent-svc-account created
clusterrole.rbac.authorization.k8s.io/nsx-node-agent-cluster-role created
clusterrolebinding.rbac.authorization.k8s.io/nsx-node-agent-cluster-role-binding created
secret/lb-secret created
configmap/nsx-ncp-config created
deployment.extensions/nsx-ncp created
configmap/nsx-node-agent-config created
daemonset.extensions/nsx-ncp-bootstrap created
daemonset.extensions/nsx-node-agent created
Use the watch command to see what is going on. After a few minutes, you should see:
loasys@kube-master01:~$ kubectl get pods --all-namespaces
NAMESPACE     NAME                                    READY   STATUS    RESTARTS   AGE
kube-system   coredns-6dcc67dcbc-rftwj                1/1     Running   4          2d6h
kube-system   coredns-6dcc67dcbc-vbftr                1/1     Running   4          2d6h
kube-system   etcd-kube-master01                      1/1     Running   0          2d6h
kube-system   kube-apiserver-kube-master01            1/1     Running   0          2d6h
kube-system   kube-controller-manager-kube-master01   1/1     Running   0          2d6h
kube-system   kube-proxy-jbxcd                        1/1     Running   0          2d6h
kube-system   kube-proxy-kxdtk                        1/1     Running   0          2d6h
kube-system   kube-proxy-q4qcs                        1/1     Running   0          2d6h
kube-system   kube-scheduler-kube-master01            1/1     Running   0          2d6h
nsx-system    nsx-ncp-bc857f4b9-x29kt                 1/1     Running   0          14m
nsx-system    nsx-ncp-bootstrap-r6blg                 1/1     Running   0          14m
nsx-system    nsx-ncp-bootstrap-tj2pz                 1/1     Running   0          14m
nsx-system    nsx-ncp-bootstrap-zwthn                 1/1     Running   0          14m
nsx-system    nsx-node-agent-g5nkg                    3/3     Running   0          14m
nsx-system    nsx-node-agent-nj8jl                    3/3     Running   0          14m
nsx-system    nsx-node-agent-vh2ln                    3/3     Running   0          14m
Remember on Part1 our nodes were in “Not Ready” state.
Issue the “kubectl get nodes” command.
loasys@kube-master01:~$ kubectl get nodes
NAME            STATUS   ROLES    AGE    VERSION
kube-master01   Ready    master   2d6h   v1.14.8
kube-worker01   Ready    <none>   2d6h   v1.14.8
kube-worker02   Ready    <none>   2d6h   v1.14.8
Namespace and Tier-1 router
In this configuration we choose to have a Tier-1 router per namespace but NSX-T 2.5 also allow a topology with a single shared Tier-1 router for all namespace. (In the shared Tier-1 router mode, each created namespace will have a new segment on the shared Tier-1).
Issue the “kubectl create namespace loasys” to create a new namespace.
loasys@kube-master01:~$ kubectl create namespace loasys
namespace/loasys created
Let’s go to NSX Manager to see what happened. Beware that all object created by the kubernetes NSX control plane are located in the old fashioned UI.
Go to “Advanced Networking & Security”, click “Routers” under “Networking”. You should see a “k8s02-loasys” Tier-1 router
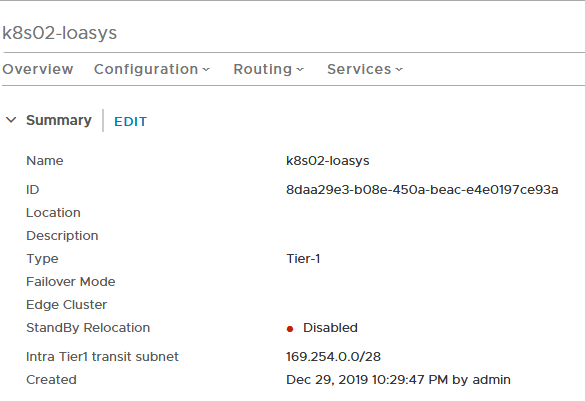

If we go to “Configuration” dropdown list and click “Router Ports”, we should see a “Downlink” containing an IP address in a /24 subnet of the container_ip_blocks.
Deploy App with load balancer
We are going to deploy a WordPress APP with a load balancer and see it automatically configured on NSX-T.
Donwload the YAML file for wordpress available on Kubernetes.io.
I have remove the persistent volume and volume claim as this is not needed for this test.
I have also added an ingress on the wordpress deployment which will have http and https with the load balancer as backend.
---
apiVersion: extensions/v1beta1
kind: Ingress
metadata:
  name: wordpress-ingress
spec:
  tls:
  - hosts:
    - wordpress.loasys.lan
  backend:
    serviceName: wordpress
    servicePort: 80
Issue the “kubectl create -k ./ -n loasys” command to create the deployment in the loasys namespace.
loasys@kube-master01:~/wordpress$ kubectl create -k ./ -n loasys
secret/mysql-pass-b727294t7t created
service/wordpress-mysql created
service/wordpress created
deployment.apps/wordpress-mysql created
deployment.apps/wordpress created
ingress.extensions/wordpress-ingress created
Let’s check out in kubernetes what was created and which ip addresses were used.
loasys@kube-master01:~/wordpress$ kubectl get all -n loasys
NAME                                  READY   STATUS    RESTARTS   AGE
pod/wordpress-57dcdd76c5-mmq84        1/1     Running   0          93s
pod/wordpress-mysql-86c56c7fc-r5gv7   1/1     Running   0          93s

NAME                      TYPE           CLUSTER-IP       EXTERNAL-IP   PORT(S)        AGE
service/wordpress         LoadBalancer   10.105.102.183   10.30.30.3    80:30844/TCP   93s
service/wordpress-mysql   ClusterIP      None             <none>        3306/TCP       93s

NAME                              READY   UP-TO-DATE   AVAILABLE   AGE
deployment.apps/wordpress         1/1     1            1           93s
deployment.apps/wordpress-mysql   1/1     1            1           93s

NAME                                        DESIRED   CURRENT   READY   AGE
replicaset.apps/wordpress-57dcdd76c5        1         1         1       93s
replicaset.apps/wordpress-mysql-86c56c7fc   1         1         1       93s

loasys@kube-master01:~/wordpress$ kubectl get ingress -n loasys
NAME                HOSTS   ADDRESS      PORTS     AGE
wordpress-ingress   *       10.30.30.2   80, 443   3m24s
We can see that the load balancer took the IP address 10.30.30.3 as external IP address so did the ingress. This is great as it’s an IP address from the K8S02-LB_IPPOOL we defined earlier.
Let’s check out what was created in NSX.
Go to “Advanced Networking & Security”, click “Load Balancers” under “networking” and go to the “Virtual servers” tab.

It’s all good, everything is working and we have access to the wordpress page. There is a lot to test like frontend scale which will automatically add members to the server pool, have fun!
That’s it !, i hope you found this series useful.